Mailchimp
This document explains the steps to configure Mailchimp as an ESP.
Mailchimp is an email service provider that helps businesses create and send email campaigns, manage their subscriber lists, and track the performance of their email marketing efforts.
Mailchimp helps users optimize their email marketing campaigns with user-friendly, customizable templates, segmentation options, and analytics tools. It also provides AI-assisted suggestions to create engaging, personalized content by predicting customers' needs.
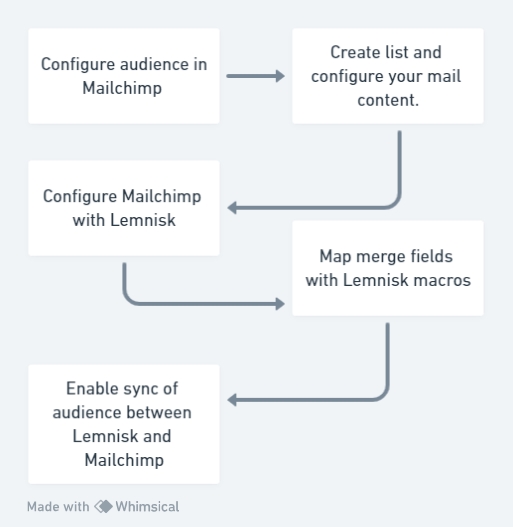
Configuration Flow
Pre-requisites to configure Mailchimp
Account at Mailchimp, preferably paid. Check out Mailchimp's pricing plans for more details.
A list (audience) to import the contacts from Lemnisk to Mailchimp. Check the Mailchimp documentation on how to create an audience.
Configure Mailchimp with Lemnisk
Step 1: Region / Data Center
Enter the Mailchimp data centre prefix (e.g., us13, us10).
Step 2: API Key
Use an existing Mailchimp API key or create a new one. The steps to generate an API key are described in the Mailchimp documentation.
Step 3: Authenticate
Click Authenticate after entering the Region and API key. List Settings will be enabled once authentication is successful.
Step 4: List Settings
The list settings will display the existing Mailchimp lists. Select a list from the drop-down. Once you select the list, you'll be able to see the List ID and member count in the list. We strongly suggest that you make a separate list for Lemnisk to ensure data consistency.
Once you select the list, we will show the Merge Fields configured with the list. Map the merge field with a Lemnisk personalization macro. This mapping will be used to sync the contacts at Mailchimp. The macro value will be replaced with the value stored in the user profile at Lemnisk during the audience sync at Mailchimp. You can change the mapping anytime.
Merge fields are personalization variables at Mailchimp that can be used to personalize campaigns. Merge fields can be mandatory and in such conditions, you have to add value to them. This value can be static or macro, and the mandatory field will be denoted with a red asterisk (*).
Step 5: Additional Settings
Skip Merge Validation: By default, we will not sync the user to Mailchimp if the respective merge field is set as Required at Mailchimp and the personalisation macro value in Lemnisk is not present for that user. If you would like to change the behaviour, you can check this option.
If you check this option, the user will be synced to Mailchimp with an empty value for the merge field even when it is set as required. Selecting the Skip Merge Validation checkbox in the Additional Settings offers different use cases to add users to Mailchimp in the following scenarios.
Skip Merge Validation is true and the macro value is not present: In this case, the user will be added to the list.
Skip Merge Validation is false and the macro value is not present: In this case, the user will not be added to the list.
Skip Merge Validation is true or false, and macro is present. In this case, the user will be created or updated at Mailchimp.
Step 6: Email ID
This email ID will be used to update the user in the following scenarios:
Segment sync failing: If a sync fails for a certain segment
List sync failing: Whenever sync fails for the entire list
Inactive segment sync is successful: Once the inactive segment has been synced.
Step 7: Save and Sync
Save Details: Click on Save Details to save the configuration without starting the sync. You can start the sync later.
Save Details and Start Sync: Click on Save Details and Start Sync to save the configuration and synchronize audience data with Mailchimp. Please note that you will not be able to change the list settings once the sync has started. To change the list, you will need to deactivate the current configuration and add a new Mailchimp configuration.
Understanding the sync process
Once you activate the sync, there will be two sync processes happening in the background simultaneously:
Contacts sync in Mailchimp list: All the users in Lemnisk who have a valid email ID will be synced to the selected Mailchimp list. This may take up to several hours depending on the number of users. Once the Mailchimp count matches Lemnisk, the sync will be completed.
Segment/tag creation and adding the users to the segment in Mailchimp: All the active segments present at Lemnisk will be synced to Mailchimp as "tag". The tag name will be the same as the segment name in Lemnisk. The users with valid email IDs present in the segment will be tagged with that segment name at Mailchimp.
Once the initial sync is completed, the real-time sync will be active. Any user who is created at Lemnisk or added to a segment will be added to the Mailchimp list and tagged with the segment by default. New active segments will be synced automatically.
Syncing an inactive segment
There may be a use case where you would like to sync an inactive segment in Lemnisk to Mailchimp. For example, if you only want to run email campaigns for that segment on Mailchimp and no other channel engagement is required, you can sync the inactive segment to Mailchimp and directly run the campaigns at Mailchimp. To sync an inactive segment, follow the below steps:
Step 1: Go to > Campaign > Segments
Step 2: Select a segment from the list
Step 3: Click Email
Step 4: Click Activate displayed beside the notification "Segment is not synced with Mailchimp"
Step 5: Click Confirm on the prompt displayed to ensure activation.
You can activate and deactivate the synchronization at the global level after the configuration. The sync will stop, but the old users in the list and tags will remain at Mailchimp.
Points to Note
Once the ESP is configured and started synchronization, the segment will be exported to the selected list in Mailchimp with the same segment name as in Lemnisk, which can be changed from the Mailchimp Dashboard.
Deactivating any particular segment will only stop adding users to the Mailchimp tag/segment and won't stop users from adding to the main list.
Deactivating the segment at the global level will stop sync, and the remaining users will be present in Mailchimp.
If a segment is deleted from Mailchimp, the synchronization process for that segment will fail. Once you make the segment inactive and make it active again, the segment will be created again in Mailchimp, and the sync will continue in a regular fashion.
Last updated